How to convert the third-party jar file to OSGI bundle using Eclipse Plugin project


URL to download the third party Jar file.
                        http://maven.ibiblio.org/maven2/junit/junit/4.4/

Pre-requisite :
                     - JRE 1.8 
                     - AEM instance up and running

Deployment of non-OSGI file to Felix console thoroughs below error.


HTTP ERROR: 500

Problem accessing /system/console/bundles. Reason:
    java.io.IOException: Bundle-SymbolicName header missing, cannot install bundle


Powered by Jetty://


Solution :


  • File-->new-->other-->Plug in Development-->plug in from existing JAR Archives-->Next


  • Next-->Add external Jar-->path to downloaded jar file in the above URL-->Next
  • Enter the Project name- TestJunit-->Finish


  • Righ click on TestJunit project-->configure-->convert to Maven project-->select the Project(TestJunit) -->Finish

  • Open the Menifest.mf file to check the additional headers added to the files
  • Select the TestJunit Project -->right click -->Run as -->Maven install

  • Observe the Build Success and TestJunit-0.0.1-SNAPSHOT.jar file under Target as shown in below screenshot
 
  • Now deploy the TestJunit-0.0.1-SNAPSHOT.jar file to felix consol.

How to convert the third-party jar file to OSGI bundle


URL to download the third party Jar file.
                        http://maven.ibiblio.org/maven2/junit/junit/4.4/

Pre-requisite :
                     - JRE 1.8 
                     - AEM instance up and running

Solution :


  • Create a manifest.txt file and add the below code:


Manifest-Version: 1.0
Created-By: Yourname
Bundle-ManifestVersion: 2
Bundle-Name: JUnit 4.4 bundle
Bundle-Description: Package junit 4.4 in an OSGi bundle
Bundle-Version: 4.4.0
Bundle-ClassPath: .,junit-4.4.jar
Bundle-SymbolicName: org.junit.framework
Export-Package: junit.framework,junit.extensions,org.junit.runner,org.junit,junit.textui


Where -
  • Bundle-ClassPath - Specify the Original jar file name here.
  • Export-Package  - Shows the list of package contained in the junit-4.4.jar file
Use the below command to convert the Third party jar file to OSGI bundle
                   

  • Open the commond propmpt and navigate to the path where manifest.txt & Junit-4.4 jar file was downloaded and created the manifest.txt.


  • Run the below commond to convert custom third-party jar file to OSGI bundle

                             D:\jar cvfm junit-4.4-bundle.jar manifest.txt junit-4.4.jar
where - junit-4.4-bundle.jar is the Osgi bundle name
junit-4.4.jar - downloaded third party Jar file
manifest.txt - the file created above.


That's it - OSGI bundle created(provided there is no external jar file dependency to the Junit-4.4.jar file)

  • Deploy the Junit-4.4-bundle.jar file to AEM instance through OSGI console as shown in below screenshots.


  • Post the installation of bundle, check the status of bundle as show in below snapshot.


How to sync content,components and templates...etc files from CRXDE to Eclipse IDE Projects and vice versa

Statement : How to synchronize the content,components & templates or any other files from CRXDE console to same project in Eclipse IDE.


  • Status of project structure before creating any new components in AEM through crxde light
  • Status in CRX/de light

  • Status in Eclipse

  • Create a new component in the project which was deployed through Eclipse in AEM 
  • Created BannerList component as shown in below.


  •  Enter the Label,Title,description..etc as show in below.


  • Click on Next -->Next-->Finish. 


  • Now how to Sync the BannerList component back to the project in Eclipse 


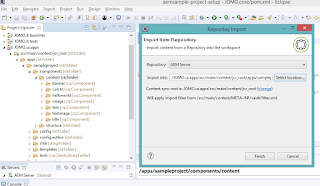
  • Choose Import from Server option


  • Choose the Project module content location to be selected for sync.


  • Below screenshot Indicates Sync is in Progress


  • Right click on project .apps to refresh, now you can see the BannerList component is Synced.


Statement : How to synchronize the content,components & templates or any other files from Eclipse IDE to CRXDE light.


  • Right click to add a new node(amptest) the project /apps/sampleproject/components/content/ as shown in below


  • Enter the name= amptest and node type=cq:Component as shown above.


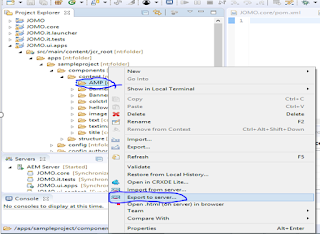
  • Now Sync this newly created node type from eclipse to AEM crxde light 
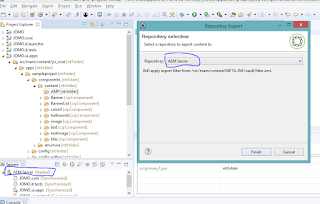
  • right click on the newly created node-->export to server -->Select AEM server(which was created during sample project setup in eclipse


  •  Click on Finish
  • Verify the same node in CRXDE light console.