How to monitor the Performance of AEM instance using JVisualVM

Statement : How to monitor the performance of AEM instance through Jconsole or JvisualVM

Pre-requisite:
      - Make sure Java SDK/JRE 1.6/1.7/1.8 installed
      - Make sure AEM instance is up and Running.

Solution:
      - For windows system , open the CMD prompt.
      - Type Jconsole or Jvisualvm or Visualvm for this example have used- Jvisualvm command


After this you can select other options, including Monitor:


- Perform GC and Heap dump
- Monitor CPU, heap usage
- Monitor Live and Daemon threads.


- Take threaddump for any analysis
- Shows LIve and Daemon threads
- Shows running, Sleeping, wait,Park and Monitor.


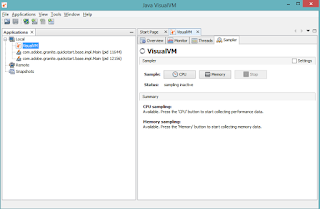
- Perfrom CPU and Memory Sampling
- Perform GC and Heap dump
- Can take snapshots


- Within the local application as shown above,Double click       on  com.day.crx.quickstart.Main
- the Overview will be shown default.


CRX/DE console doesn't show node-tree in the AEM 6.2 for the run mode - Author, CRX3 and samplecontent

Issue: CRX/DE light console doesn't show nodetree

- Run mode for Author instance as follows:

  • sling.run.mode.install.options=author|crx3|samplecontent

- Post the installation of Author instance in crx/de console shows nothing in the tree-node, refer the below screenshot.
http://localhost:4502/crx/de/index.jsp


Solution:
- Go to the http://localhost:4502/system/console/configMgr
- Search for Apache Sling DavEx Servlet
- Root path shows only /Server as shown in the below screenshot.


- Change root path from /server to /crx/server and save it.


- Go back to the /crx/de console , You will be able to see the node-tree as shown below.


How to turn any workflow model to “transient" Model

Issue:
How to turn any workflow model to Transient model:

Step1: Go to the below URL
http://localhost:4502/miscadmin#/etc/workflow/models/dam

Step2: Open any workflow model for eaxmaple - DAM Update asset.

Step3: Click on the page tab--> properties of Sidekick.

Step4: Check the enable Transient workflow under Basic tab.

Step5: Click on Ok. That's It!. as shown below


- Do not enable this option if user interested to see the run time data.

Advantages of Transient workflow:

  • Run-time Data related to any intermediate workflow steps will not be persisted into the JCR.
  • Of course the output of renditions/workflows will be persisted.
  • Lesser repository growth. 
  • Lesser/no more Workflow Purge
  • lesser tar file campact
  • increase in performance.

Note: Applicable for AEM 6.1/6.2/6.3/6.4


Instalaltion of AEM Author/Publisher instances

Instalaltion of AEM Author/Publisher instances

Steps
Solution Description
Step: 1
Make sure Java version
# java -version
java version "1.7.0_25"
Step: 2
Java home directory
/usr/java/jdk1.7/bin
Step: 3
Set open file limits
Default Publish user open file limits:1024
Set Author user open file limits: 12000

Step: 4
Create Publish user which home directory:
·         /adobe/aem56/publish/

Step:4.1
For Content Backup:
§  /adobe/aem56/content
·         /adobe/aem56/dam
·         /adobe/aem56/tag
For Repository backup
·         /adobe/aem56/repository-backup
For Monitoring Script
/adobe/aem56/monitoring
Step:5
1. cq-publish-4503.jar
2.  license.properties
Copy the installable jar file to /adobe/aem56/publish/ folder
Step:6
Run below command to extract the CQ jar file
·         java –jar cq5-publilsh-4503.jar –unpack
Step: 7
Update sling.properties file:

org.osgi.framework.bootdelegation=com.singularity.*, com.yourkit.*, javax.xml.*,org.xml.*,org.w3c.*, ${org.apache.sling.launcher.bootdelegation}
Step: 8
Update AEM Start.sh file:
#cat crx-quickstart/bin/start

# TCP port used for stop and status scripts
CQ_PORT=4503

# HTTP host name
# CQ_HOST=                

# interface that this server should listen to
#CQ_INTERFACE='eth0'

# runmode(s)
CQ_RUNMODE=’publish,prod'

# name of the jarfile
#CQ_JARFILE=''

# use jaas.config
CQ_USE_JAAS='true'

# config for jaas
CQ_JAAS_CONFIG='/adobe/aem56/author/crx-quickstart/conf/ldap_login.conf'

# default JVM options
#CQ_JVM_OPTS='-server -Xmx4096m -XX:MaxPermSize=1024M -Djava.awt.headless=true'
CQ_JVM_OPTS='-server -Xms6192m -Xmx6192m -XX:MaxPermSize=1024M -Djava.awt.headless=true -XX:NewRatio=2 -XX:SurvivorRatio=6 -Xloggc:/data/author/crx-quickstart/gc.log -verbose:gc -XX:+PrintGCTimeStamps -Dcom.sun.management.jmxremote -Dcom.sun.management.jmxremote.port=9999 -Dcom.sun.management.jmxremote.authenticate=false -Dcom.sun.management.jmxremote.ssl=false -XX:+HeapDumpOnOutOfMemoryError -XX:+UseParallelGC -XX:+UseParallelOldGC
-Dcom.day.crx.persistence.tar.IndexMergeDelay=0
-Djackrabbit.maxQueuedEvents=1000000 -XX:ReservedCodeCacheSize=128m
-XX:ParallelGCThreads=4 -XX:+UseAdaptiveGCBoundary -XX:MaxTenuringThreshold=100 -XX:-UseGCOverheadLimit
-XX:-UseGCLogFileRotation -XX:+UseAdaptiveSizePolicy -XX:NewRatio=1 -XX:+AlwaysPreTouch'

#-XX:+UseGCOverheadLimit -Use a policy that limits the proportion of the #VM's time that is spent in GC before an OutOfMemory error is thrown
#-XX:-UseParallelGC          Use parallel garbage collection for scavenges
#-XX:-UseParallelOldGC      Use parallel garbage collection for the full collections
#-XX:NewRatio=n    Ratio of old/new generation sizes.
#-XX:SurvivorRatio=n Ratio of eden/survivor space size.
#-XX:ParallelGCThreads=n Sets the number of threads used during parallel #phases of the garbage collectors.
#-XX:MaxPermSize=64m    Size of the Permanent Generation
#-XX:SurvivorRatio=8        Ratio of eden/survivor space size

#file size limit (ulimit)
CQ_FILE_SIZE_LIMIT=8192

Step:9
Navigate to /adobe/aem56/publish/crx-quickstart/bin/start.sh
To start the AEM server in publish mode
Step:10
For Error log files validation
1.    /adobe/aem56/author/crx-quickstart/logs/error.log
For Request log files
2.    /adobe/aem56/author/crx-quickstart/logs/request.log
For Access log files
3.    /adobe/aem56/author/crx-quickstart/logs/access.log
For Audit log files
4.    /adobe/aem56/author/crx-quickstart/logs/request.log
For upgrade log files
5.    5./adobe/aem56/author/crx-quickstart/logs/request.log

Step: 11
Change CQ Admin password
http://localhost1:4503/libs/granite/security/content/admin.html


Choose the administrator user and click on edit icon to update the new password for the CQ administrator

Finally click on the submit button to change the Admin password
Step: 12
Configuring your Reverse Replication Agents from Author Environment
From the Tools tab in the author environment you can configure reverse replication agents that reside in either the author environment (Agents on author) or the publish environment (Agents on publish).

Click Replication (left pane to open the folder).


Step:13
To Open the Reverse replication agent for Publish 1
Click on edit to set the Publisher Reverse Replication Agent ,retry delay, description, serialization type, log level and Agent ID
Click on Transport tab to configure the Publish Reverse replication Agent URI and  Username Name  and password
Final click on Ok.

Step:14
Similarly Reverse replication agents needs to configure for Publish 2(localhost2) ,Publish 3(localhost3) and Publish 4(localhost4) in Master Author instance as shown in below screenshot


Apache Web server Installation and configuration of Dispatcher in AEM

Apache webserver installation and Dispatcher configuration
Steps
Solution Description
Step: 1
Make sure you have downloaded Apache 2.4.3
Download From:
#wget http://apache.techartifact.com/mirror//httpd/httpd-2.4.3.tar.bz2
Step: 2
Install the apache webserver : Extract the Zip file to the /data/downloads Directory
#tar jxvf httpd-2.4.3.tar.bz2
Step: 3
Download apr check for the latest version
Download From:
#wget http://apache.techartifact.com/mirror/apr/apr-1.4.6.tar.bz2
Step: 4

Download apr-util Check for the latest version.
Download From:

Step: 5
Extract the bzip files.

#tar jxvf apr-1.4.6.tar.bz2
#tar jxvf apr-util-1.5.1.tar.bz2
Step: 6
Rename to remove the version from the directory name.

 #mv apr-1.4.6 apr
 #mv apr-util-1.5.1 apr-util
Step: 7
Download pcre.  latest version and compile it

#wget  ftp://ftp.csx.cam.ac.uk/pub/software/programming/pcre/pcre-8.31.tar.bz2
#./configure --prefix=/etc/httpd/pcre
#make
#make install
Step: 8
Install apache

#./configure --prefix=/etc/httpd/apache2 --enable-mods-shared=all   --with-included-apr --with-pcre=/etc/httpd/pcre/
#make
#make install
Step: 9
Start Apache and verify installation
# cd /etc/httpd/apache2/bin
#./apachectl configtest
# ./apachectl  start
Or
#cd /etc/init.d/httpd start

Step: 10
Apache Configuration file:
#vi /etc/httpd.conf

ServerRoot "/etc/httpd/apache2"
Listen 80

#Modules added for
LoadModule expires_module modules/mod_expires.so
LoadModule deflate_module modules/mod_deflate.so
LoadModule headers_module modules/mod_headers.so
LoadModule rewrite_module modules/mod_rewrite.so

          User apache
          Group apache


Step: 11
Install Dispatcher
Get Dispatcher package: dispatcher-apache2.4-linux-x86-64-4.1.2.tgz
#tar zxvf dispatcher-apache2.4-linux-x86-64-4.1.2.tgz
#cp -r modules/* /etc/httpd/modules/

Create a symbolic link to name 'mod_dispatcher.so' to the dispatcher module by running the command
> ln -s dispatcher_apache_xxxx_yyyy.so mod_dispatcher.so
Step:12.1
Setting Dispatcher Handler
       
                SetHandler dispatcher-handler
                ModMimeUsePathInfo On
       
        Options FollowSymLinks
        AllowOverride None


Step: 13
Setting up the Publish renders 1,2,3 and 4
#vi /usr/local/apache2/conf/extra/dispatcher.any
                       /renders
                        {
                                /render0
                                {
                                        /hostname "localhost1"
                                        /port "4503"
                                }
                                /render1
                                {
                                        /hostname "localhost2"
                                        /port "4503"
                                }
                                /render2
                                {
                                        /hostname "localhost3"
                                        /port "4503"
                                }
                                /render3
                                {
                                        /hostname "localhost4"
                                        /port "4503"
                                }
                        }


Step: 13.1
Filter out specific URL from accessing over the internet
/filter
      {
      # Deny everything first and then allow specific entries
      /0001 { /type "deny"  /glob "*" }
    #  /0001 { /type "allow"  /glob "*" }
       
      # Open consoles
#     /0011 { /type "allow" /glob "* /admin/*"  }  # allow servlet engine admin
#     /0012 { /type "allow" /glob "* /crx/*"    }  # allow content repository
#     /0013 { /type "allow" /glob "* /system/*" }  # allow OSGi console

      # Deny query
      /0090 { /type "deny"  /glob "* *.query.json*" }
          /0091 { /type "allow" /glob "* /test/*" }
          /0092 { /type "allow" /glob "GET *.1.json*" }          # allow one-level json requests
          /0093 { /type "allow" /glob "* /auth/*" }

      }
Step: 13.2

    # The cache section regulates what responses will be cached and where.
    /cache
      {
      # The docroot must be equal to the document root of the webserver. The
      /docroot "/data/aem/dispatcher/cache"
      # Sets the level upto which files named ".stat" will be created in the
      #/statfileslevel "0"
      # Flag indicating whether to cache responses to requests that contain
      # authorization information.
      #/allowAuthorized "1"
      # Flag indicating whether the dispatcher should serve stale content if
      # no remote server is available.
      /serveStaleOnError "0"
      # The rules section defines what responses should be cached based on
      /rules
        {
        /0000
          {
          # the glob pattern to be compared against the URL
         /glob "*"
          /type "allow"
          }


Step14
Cache invalidation for webserver and access to publishers
/invalidate
        {
                /0002
          {
          /glob "/etc/segmentation.segment.js"
          /type "allow"
          }
        /0003
          {
          /glob "*/analytics.sitecatalyst.js"
          /type "allow"
          }
                   /0004
                    {
                    /glob "*.js"
                    /type "allow"
                    }         
                /0005
                    {
                    /glob "*.css"
                    /type "allow"
                    }
        }
Step: 15
Performance tuning
# this configuration file extends the basic httpd.conf
# it includes a number of options that are used to improve performance
# turn off Etags completely, since they will differ across the cluster
FileETag None
# instead we use Expires and Cache-Control headers
ExpiresActive On
ExpiresByType text/css "access plus 1 year"
ExpiresByType text/javascript "access plus 1 year"
ExpiresByType image/gif "access plus 1 year"
ExpiresByType image/jpg "access plus 1 year"
ExpiresByType image/png "access plus 1 year"
ExpiresByType application/x-shockwave-flash "access plus 1 year"
# force set Vary header so it works with proxies and IE properly
Header set Vary "Accept-Encoding"
        # enable compression for text file types: html, css, js, XML
        AddOutputFilterByType DEFLATE text/plain
        AddOutputFilterByType DEFLATE text/html
        AddOutputFilterByType DEFLATE text/xml
        AddOutputFilterByType DEFLATE text/css
        AddOutputFilterByType DEFLATE text/javascript
        AddOutputFilterByType DEFLATE application/xml
        AddOutputFilterByType DEFLATE application/xhtml+xml
        AddOutputFilterByType DEFLATE application/rss+xml
        AddOutputFilterByType DEFLATE application/javascript
        AddOutputFilterByType DEFLATE application/x-javascript
        DeflateCompressionLevel 9
        DeflateFilterNote Input instream
        DeflateFilterNote Output outstream
        DeflateFilterNote Ratio ratio

Step: 16
Test configuration
# sudo /etc/init.d/httpd status

Step: 17
Stop Apache Server

# sudo /etc/init.d/httpd stop

Step: 18
Start Apache Server

# sudo /etc/init.d/httpd stop

Step:19
Log file location
/etc/httpd/logs/