Jmeter Distributed (Remote) Testing: Master Slave Configuration-Chapter 10


What is Distributed Testing?

Distributed Testing is a kind of testing which use multiple systems to perform Stress Testing. Distributed testing is applied for testing websites and server applications when they are working with multiple clients simultaneously.
Distributes testing uses client-server model as the figure below:
How to perform Distributed Testing in JMeter
  • Master: the system running JMeter GUI, control each slave.
  • Slave: the system running JMeter-server, receive a command from the master and send a request to a server under test.
  • Target: the web server under test, get a request from slaves.

Remote Test Example

Precondition:
  • The firewalls on the systems are turned off. In some cases, the firewall may still be blocking the traffic. You should disable the Window firewall or Linux firewall.
  • All the machines should be on the same subnet. If machines are not on the same subnet, maybe they will not recognize each other in the network.
  • Use the same version of JMeter to avoid unanticipated errors/issues.
Here is the roadmap for this testing:
How to perform Distributed Testing in JMeter

Step 1) System configuration

Setup slave systems, go to jmeter/bin directory and execute file "jmeter-server.bat".
Assume that a slave machine has IP address: 192.168.0.10. On windows, you should see a window appear like the following figure:
How to perform Distributed Testing in JMeter
On the master systems, go to /bin directory and edit file jmeter.properites, add IP slave machine as below
How to perform Distributed Testing in JMeter

Step 2) Run the test

At this point, you are ready to start load testing. On the master machine, run JMeter GUI and open the test plan.
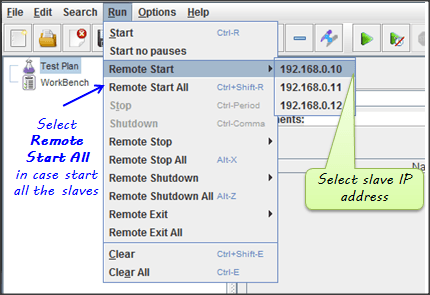
Click Run on the menu bar; select Remote start -> select the IP address of slave machine
How to perform Distributed Testing in JMeter

Step 3) Troubleshooting

If you are unable to run test form the above machine and see below error, simply ask an owner of a slave machine to run the JMeter-server.bat File.
How to perform Distributed Testing in JMeter
Disable Firewall on both master and slave machines to fix this error.

Limitation:

There are some basic limitations for distributed testing. Here's list of the known items:
  • Server and all clients must be on the same subnet.
  • Distributed testing required target server to have the large processing power. The target Server could be easily overloaded in case it gets too many requests by distributed JMeter tests.
  • A single JMeter can only handle a limited number of threads (100- 300 threads).
  • The distributed JMeter tests are complex, difficult for a beginner to build.

HTTP Proxy Server in JMeter: Record Example Script-chapter 11


Record Testing help tester to record & run their activity against test target. It is a type of automated testing but for multiple users. This tutorial guides you how to use Proxy Server to record your test.
The Proxy Server allows JMeter to watch and record user activity while they are browsing web application with a normal browser.
In this tutorial, you will learn
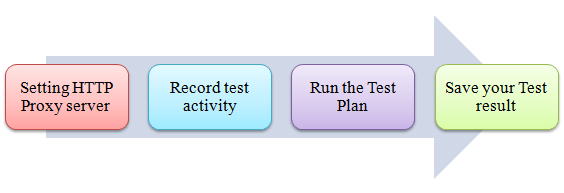
  • Step 1) Setting HTTP Proxy server
  • Step 2) Record your activity
  • Step 3) Run your Test Plan
  • Step 4) Save your test result
Here is the roadmap of this practical example
HTTP Proxy Server Testing using Jmeter

Step 1) Setting the HTTP Proxy server

This is a Step-by-step guide to setup proxy
  1. Start JMeter
  2. Select Test Plan on the tree
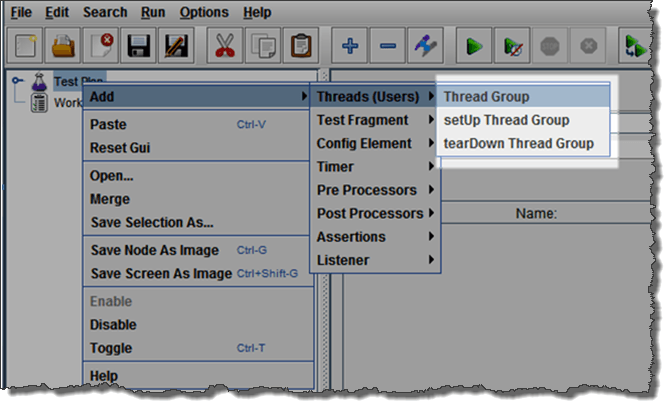
  3. Add Thread Group
    Right click on the Test Plan and add a new thread group: Add => Threads (Users) =>Thread Group
HTTP Proxy Server Testing using Jmeter
  1. Add HTTP Request
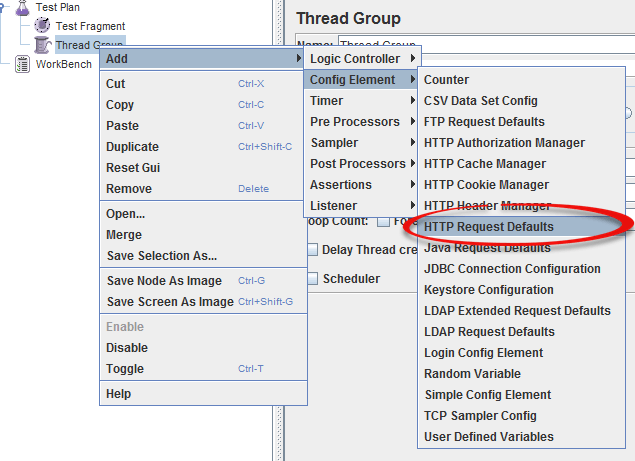
    Select the Thread Group; right click Add => Config Element => HTTP Request Defaults
HTTP Proxy Server Testing using Jmeter
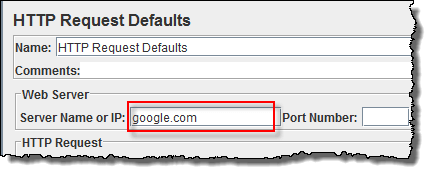
In new HTTP Request Defaults element: In Server name or IP, enter "google.com". You should keep the others fields blank

HTTP Proxy Server Testing using Jmeter
  1. Add Recording Controller
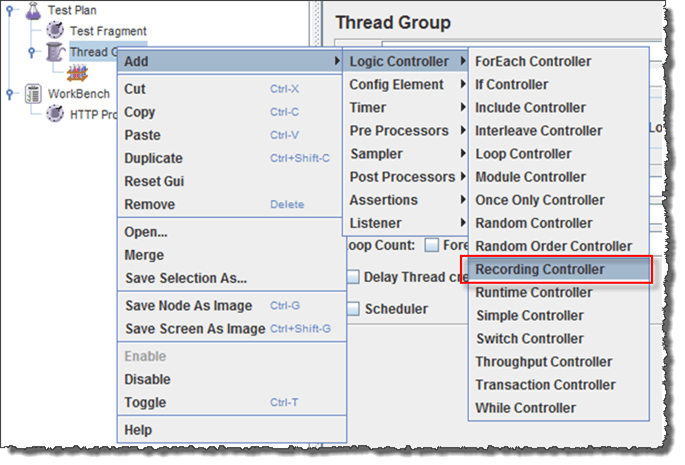
    Right click on the "Thread Group" and add a recording controller: Add => Logic Controller =>
    Recording Controller
HTTP Proxy Server Testing using Jmeter
  1. Add Proxy Server to WorkBench
    Right click on the Workbench and add the http proxy: Add => Non-Test Elements => HTTP Proxy Server  
    HTTP Proxy Server Testing using Jmeter
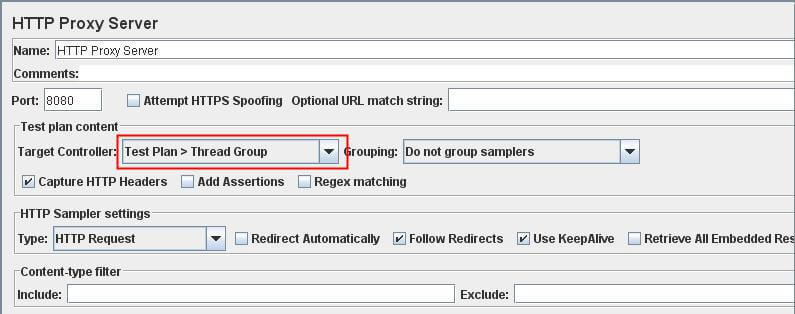
  2. Set Target Controller where your recorded scripts will be added
HTTP Proxy Server Testing using Jmeter

  1. Start Proxy Server
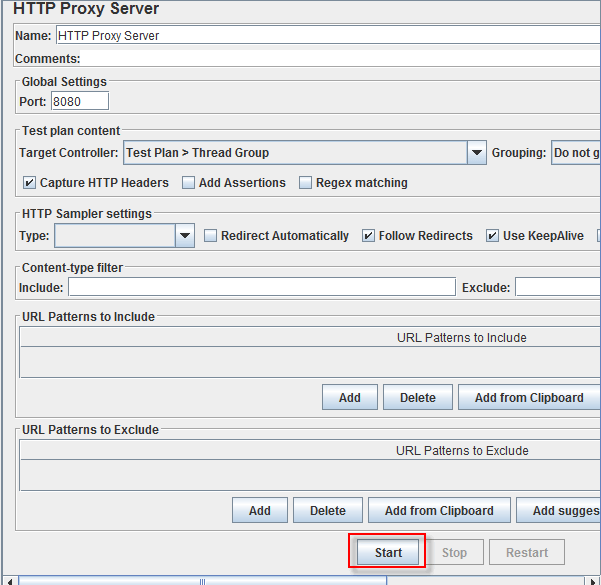
    Return to HTTP Proxy Server, and click the Start button at the bottom. Now your JMeter proxy server start
    HTTP Proxy Server Testing using Jmeter  
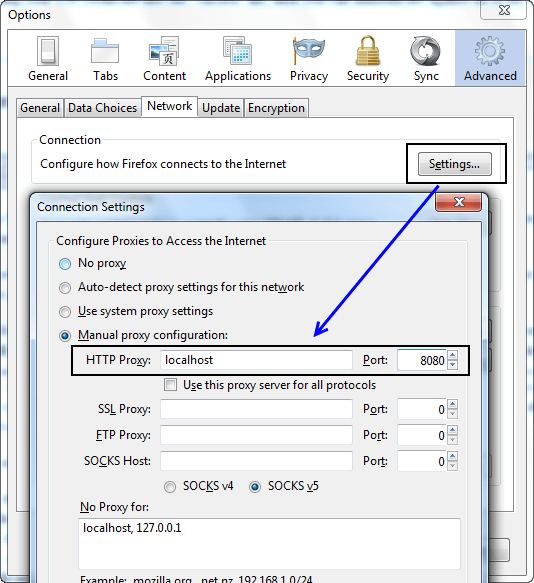
  2. Start your Browser  choose Tool => Option => Advanced => Network => Setting => Enter HTTP proxy as figure below
     
    HTTP Proxy Server Testing using Jmeter

Step 2) Record your activity

  1. Now Launch http://www.google.com in your web browser (JMeter still open)
  2. Do activities search the keyword "apache".
  3. Back to JMeter, in HTTP Proxy Server, click Stop when finished
     

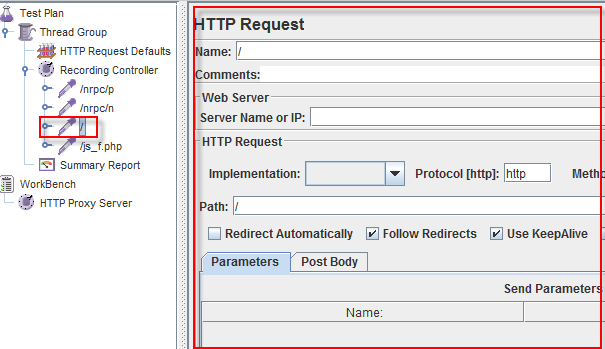
  4. After finishing recording, you will see JMeter automatically created a new HTTP request as the figure below
    HTTP Proxy Server Testing using Jmeter
    JMeter has already recorded a user request to the Home Page of Google website. Http://www.google.com/
    The other HTTP requests display in above figure, you should remove them. Because sometime JMeter also records some advertising links while you are searching keyword on Google. We should ignore them in our Test Plan
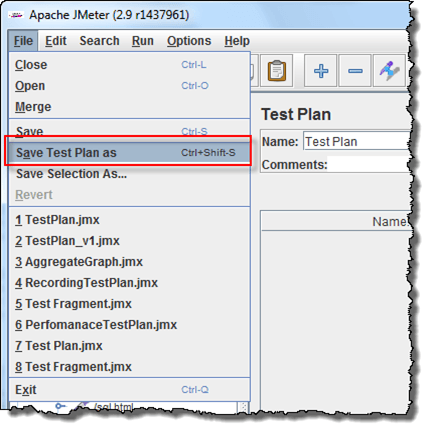
  5. Click File => Save your Test Plan as
    HTTP Proxy Server Testing using Jmeter
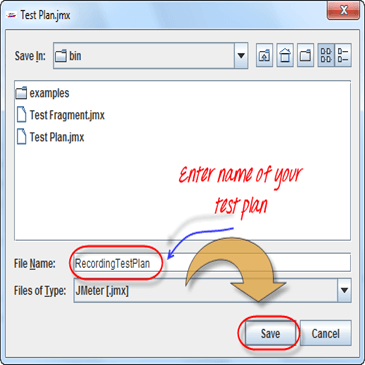
  6. A Dialog box display => enter a name of your test plan at File Name field => Click Save
    Now your Test Plan is saved under name RecordingTestPlan.jmx
HTTP Proxy Server Testing using Jmeter

Step 3) Run your Test Plan

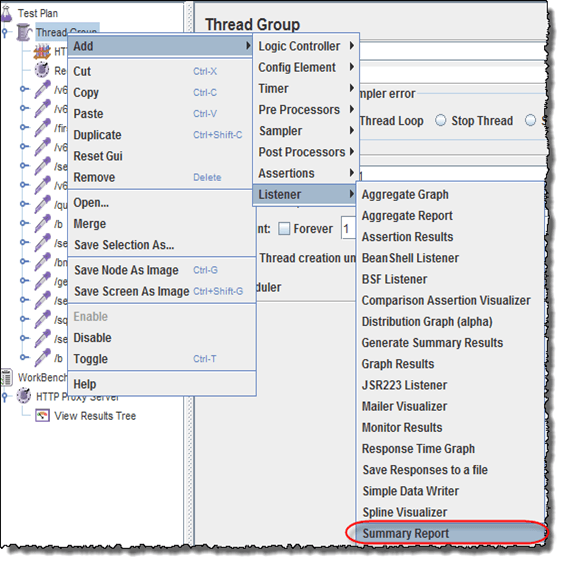
  1. Select Thread Group => Add => Listener=> Summary Report

HTTP Proxy Server Testing using Jmeter
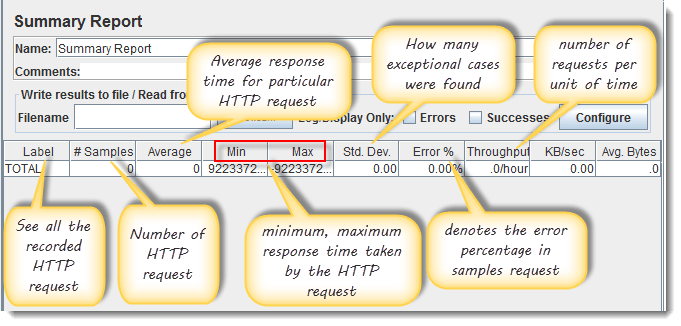
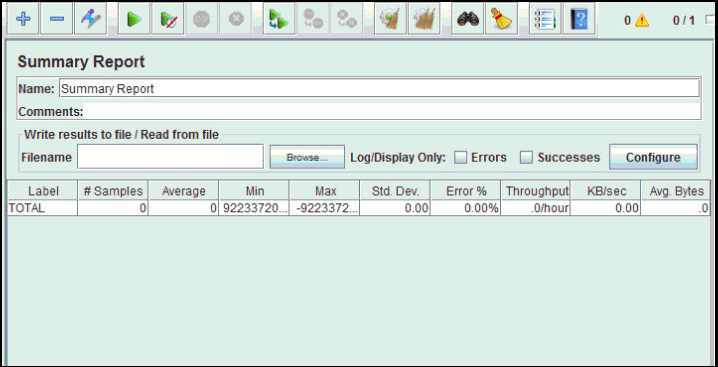
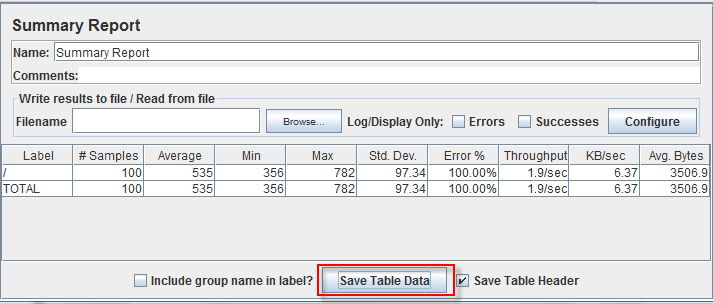
  1. The Summary Report will show some basic statics
    HTTP Proxy Server Testing using Jmeter
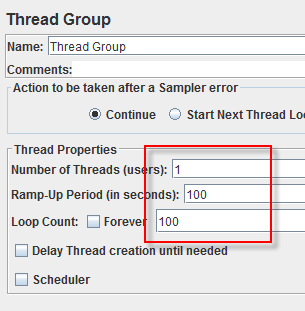
  2. Select Thread Group, enter information as the figure below
HTTP Proxy Server Testing using Jmeter


  1. Before you start the test, select "Summary Report". When you ready to run a test, select Run => Start (Ctrl+R). JMeter will playback your activity in 100 times
    As the test runs, the statistics will change until the test is done.
    HTTP Proxy Server Testing using Jmeter

Step 4) Save your test result

  1. Click Save Table Data to save test result to file
HTTP Proxy Server Testing using Jmeter
  1. Enter the name of the test result and click Save. Test Result in JMeter is saved in *.csv format as default
HTTP Proxy Server Testing using Jmeter

What is JMeter? Why it is used?-Chapter 1


The Apache JMeterTM is pure Java open sourcesoftware, which was first developed by Stefano Mazzocchi of the Apache Software Foundation, designed to load test functional behavior and measure performance.
 You can use JMeter to analyze and measure the performance of web application or a variety of services.
Performance Testing means testing a web application against heavy load, multiple and concurrent user traffic. 
JMeter originally is used for testing Web Application or FTP application. Nowadays, it is used for a functional test, database server test etc.

Why JMeter?


Have you ever tested a web server to know how efficiently it works? How many concurrent users can a web server handle?
Let say that one day, your boss asks you to do performance testing of www.google.com for 100 users. What would you do?

It's not feasible to arrange 100 people with PC and internet access simultaneously accessing google.com Think of the infrastructure requirement when you test for 10000 users (a small number for a site like google). Hence you need a software tool like JMeter that will simulate real-user behaviors and performance/load test your site.

JMeter Advantages

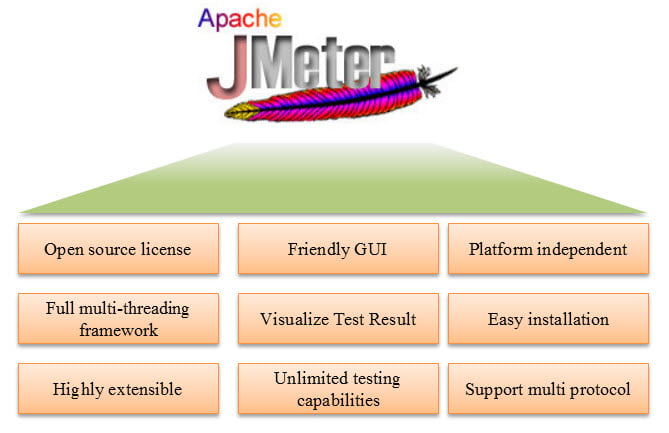
JMeter advantages are described as figure below
Introduction to JMeter
  • Open source license: JMeter is totally free,  allows developer use the source code for the development
  • Friendly GUI: JMeter is extremely easy to use and doesn't take time to get familiar with it
  • Platform independent: JMeter is 100% pure Java desktop application. So it can run on multiple platforms
  • Full multithreading framework. JMeter allows concurrent and simultaneous sampling of different functions by a separate thread group
  • Visualize Test Result: Test result can be displayed in a different format such as chart, table, tree and log file
  • Easy installation: You just copy and run the *.bat file to run JMeter. No installation needed.
  • Highly Extensible: You can write your own tests. JMeter also supports visualization plugins allow you to extend your testing
  • Multiple testing strategy: JMeter supports many testing strategies such as Load Testing, Distributed Testing, and Functional Testing.
  • Simulation: JMeter can simulate multiple users with concurrent threads, create a heavy load against web application under test
  • Support multi-protocol: JMeter does not only support web application testing but also evaluate database server performance. All basic protocols such as HTTP, JDBC, LDAP, SOAP, JMS, and FTP are supported by JMeter
  • Record & Playback Record the user activity on the browser and simulate them in a web application using JMeter
  • Script Test: Jmeter can be integrated with Bean Shell & Selenium for automated testing.

How does JMeter work?

The basic workflow of JMeter as shown in the figures below
JMeter simulates a group of users sending requests to a target server, and return statistics information of target server through graphical diagrams
Introduction to JMeter
The completed workflow of JMeter as shown in the figure below
Introduction to JMeter

Jmeter Version History

VersionDescription
1first official release
2.13Java 6+
3Java 7+
3.1Java 7+
3.2Java 8+
3.3Java 8
4Java 8 / 9